Finished your edit? Ready to move on to color and sound? Here’s how we ask our clients to prepare their Adobe Premiere timeline in order to streamline the color grade and audio mix process.
For those of you who prefer to follow along in text form, you can find screenshots and all the written instructions below.
When you’ve finished, you should end up with a drive containing all of the following items:
☐ Reference file
☐ Premiere Project
☐ XML for color
☐ AAF for sound
☐ ProRes444 Alpha graphics
☐ Camera information
☐ All necessary footage
Exporting for Color Grading
1. Export a reference file.
Export a file from your current timeline, (preferably with timecode, but it’s not required). It doesn’t have to be full quality; this file will serve as a reference in case we need to check if anything is out of place later.
2. Prepare your timeline for export.
Duplicate your timeline. Label it “For Color” or something similar.
On the new timeline, flatten all your multicam clips.
Flatten all your B-roll into V1. If you have footage that cannot be brought into V1 because it’s overlaid over other footage to create an effect, leave it on the second video track.
(click to view full photo)
Disable or delete your graphics layer (optional). We have specific instructions on how we’d like you to export your graphics down below.
(click to view full photo)
If you run into issues or are unsure of anything, please reach out to us and we can answer your questions or help you troubleshoot!
3. Export your timeline as an XML.
File → Export → Final Cut Pro XML
Even though it says Final Cut Pro, it will still export a timeline that works for Resolve.
4. Package the project.
Exporting a timeline like we did means that Resolve is referencing the exact same footage that you’ve been editing. This means that simply sending us the XML or AAF is not enough. We’ll also need all of the footage included in the timeline.
Most clients will send us a drive with all of their footage, their Premiere project, and XML files we exported in Step 3. We prefer this method. This way, if we need to re-export or reference the Premiere project, it’s easy for us to do so.
That said, if your project is bigger than your drive, and you only want to send us the clips included in your timeline, there are a few options.
Using PlumePack Manager
Download the free PlumePack Premiere plugin here. We like PlumePack because it doesn’t re-encode your footage when it packages your project. We use their paid version, which is a one time purchase that includes their premium features, but the free version will work just fine in this case. (We love PlumePack and would definitely reccomend it. Learn more about their free vs. Premium plugin’s features here.)
They have extensive documentation on how to use the plugin, but feel free to reach out if you have questions.
Using the Project Manager dialog within Premiere
Go to: File → Project Manager.
Select the first option: “Collect Files and Copy to New Location.”
Here’s what the dialogue box should look like.
(click to view full photo)
You can select “Calculate” at the bottom of the window to see how much space the footage will take up.
5. Tell us about your footage.
In order to get our project settings and color management of your image as accurate as possible, it’s important to know a few things about your footage.
Please tell us (either in a text file on the drive or in an email):
Which camera you shot on
Which color space you used
What gamma you shot in
If you shot on multiple different cameras, it’s good to know that. Please specify this info for each camera (drone, A cam, B cam, etc). For example, our footage information might look like this:
Sony FX6 (A cam) & Sony FX3 (B cam)
Color space: S-Gamut 3.Cine
Gamma: S-Log3
Mavic 3 Pro Cine (drone)
Color space: DJI D-Gamut
Gamma: DJI D-Log
Knowing this information helps us better understand and process your image as your camera(s) intended us to!
If you’ve got graphics and/or are also having your film’s audio mixed with us, keep reading. Otherwise, box up your project drive and send it off!
Exporting Graphics
To keep things simple, we’re going to create a single graphic overlay video.
Turn off all underlying video layers but keep the graphics layer visible.
(click to view full photo)
Export. File → Export → Media
(click to view full photo)
File Name: Something like “Project Name_Graphics”
Preset: Apple ProRes 444 with Alpha
Format: QuickTime
Pop this file on the hard drive you’re sending to us. Doesn’t matter much where, as long as we can find it. If you’re also having your film’s audio mixed with us, keep reading. Otherwise, box up the drive and send it off!
Exporting for Audio Mixing
1. Prepare your timeline for export.
Organize your audio tracks into three groups of tracks:
Interviews. IMPORTANT NOTES:
- Label each track!
- Each speaker/interviewee should be on their own audio track.
- Lav and boom channels must be labeled and kept separate on their own tracks throughout the timeline.
Nat-sound and b-roll audio. You don’t need to separate all of these sounds into their own tracks, you can leave them however you have them.
Music.
Please leave any adjustments, fades, gain changes, etc. on the clips.
Your audio tracks should end up looking something like this:
(click to view full photo)
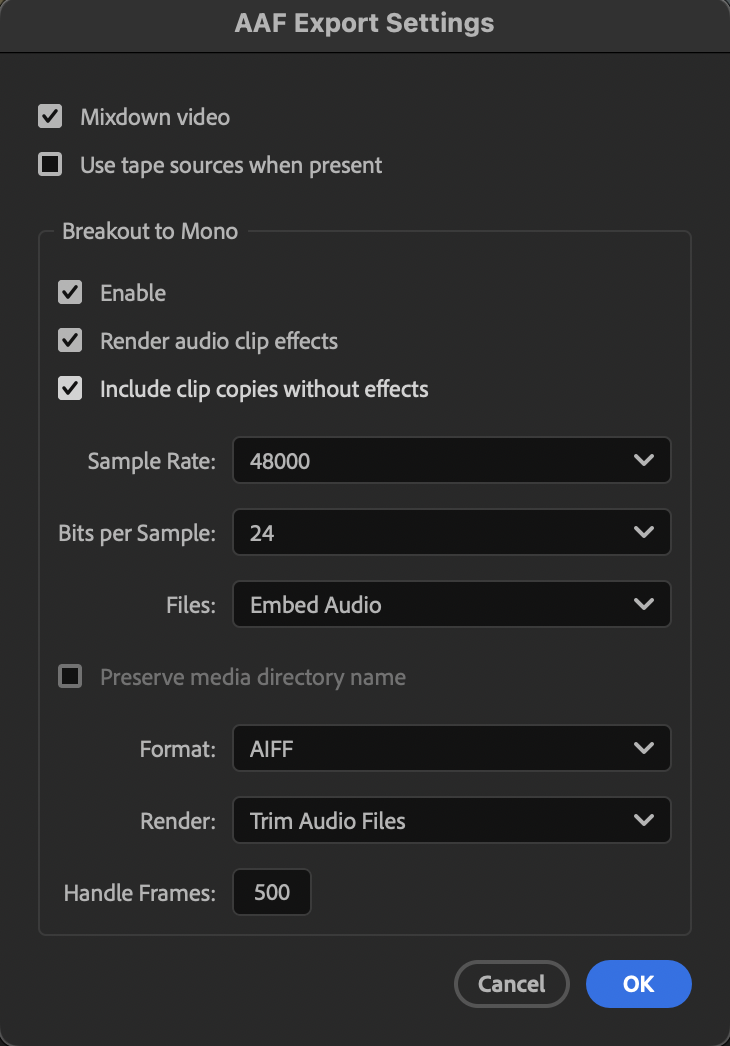
2. Export an AAF.
File → Export → AAF
Please use these settings:
(click to view full photo)
If you exported an AAF for color as well as sound, make sure each one is labelled accordingly as the settings are different.
Checklist
Double check you’ve got all of the following files on your drive.
☐ Reference file (export of your picture lock)
☐ Premiere Project (with a new timeline labeled “For Color” and flattened into one track for video, one for audio)
☐ XML for color, exported from that new Premiere timeline
☐ AAF for sound (separated into nat sound & broll, music, and interviews – with each speaker, labelled, on their own track)
☐ Graphic overlay (QuickTime file containing only your graphics layers in ProRes444 Alpha)
☐ Camera information (type, color space, gamma)
☐ All necessary footage
Sending the Drive
Ship the drive or drop it off to us at:
Frostline Studios
ATTN: [Colorist and/or Audio Engineer]
3700 Woodland Drive, Suite 100
Anchorage, AK 99508
Make sure to include any cords or cables. If you need us to return the drive to you when we’re done, please also include your return address.
If you’re having trouble, don’t hesitate to reach out. The most important thing is to make sure the timeline is organized; taking the time to get everything organized before diving into color grading and audio mixing will save you – and us – from headaches down the road. It’s so worth taking the time to do!


